2.9.1 | 8/1/2025
Step 1: Add Component | Step 2: Build Routine | Step 3: Build Template | Step 4: Add Template | Step 5: Add Backup Dancers | Step 6: Save Routine| Step 7: Activate Routine
Getting Started with Mambo Merge
With Mambo Merge installed from the AppExchange, you are almost ready to start generating professional digital documents right out of Salesforce. So, let’s help you get started!
Note: When Mambo Merge is installed into a Salesforce Org, the org is granted a Trial of the Full Speed Edtion autmotically. You will be able to test drive all the Full Speed Features.
Video
Here you can follow along with our instructional video for setting up Mambo Merge. Consider these your ‘Mambo Moves’ to get you moving in the right direction!

Step 1: Add Mambo Component ↵
Mambo Merge is a Lightning Web Component that you can add to any record page. You can even add multiple components to one page.
1.1 First head over to a record page.

1.2 Click the “Gear” icon in the top right-hand corner and select “Edit Page” from the dropdown menu.

1.3 This will launch the “Lightning App Builder”. Here you can move, add or remove components on your page layout.
1.4 On the left side panel, you can type “Mambo Merge” to locate the Mambo Merge component under “Custom - Managed”.

1.5 Next, simply drag and place an instance of the Mambo Merge component on the page. You can place the component where the green area highlights as you hover around the page layout.

Note: Once placed, the right panel will display the configuration settings. You can also click any component to display the configuration settings of those components.
1.6 If you have never saved changes to your page layout, you’ll need to activate the page. You can click the “Activation” button in the top right, or you will be prompted when you click the “Save” button.

Note: If the Activation button is not highlighted it means your component has been activated. Proceed to the next step.
1.7 In the activation window, go ahead and click on “Assign as Org Default”.

1.8 The next window will let you assign access to this component on either a desktop, mobile, or both. We recommend that you provide access to both. Select “Desktop and phone” then click Next.

1.9 The last window reviews your changes. Click on “Save” to activate the component. Back on the lightning app builder, click the “Save” and “Back Arrow” buttons to complete this step of the process.

Note: Customize your choices that match your org needs.

Note: The Save button can be found in the top right-hand corner while the Back Arrow will be located in the top left-hand corner of the lightning page.
Step 2: Build A Routine ↵
Now that your component is added to the object page we can begin to build a routine.
2.1 Locate your Mambo Merge component that was added.

2.2 Click on the “dropdown menu” in the top right of the Component, and select “Studio” from the dropdown menu.

2.3 This launches the Studio in a modal window. Click on “New Routine” in the top right.

2.4 The Studio walks you through key steps to set up and save a routine. Start by selecting a “Primary Salesforce Object” you plan to build the routine around.
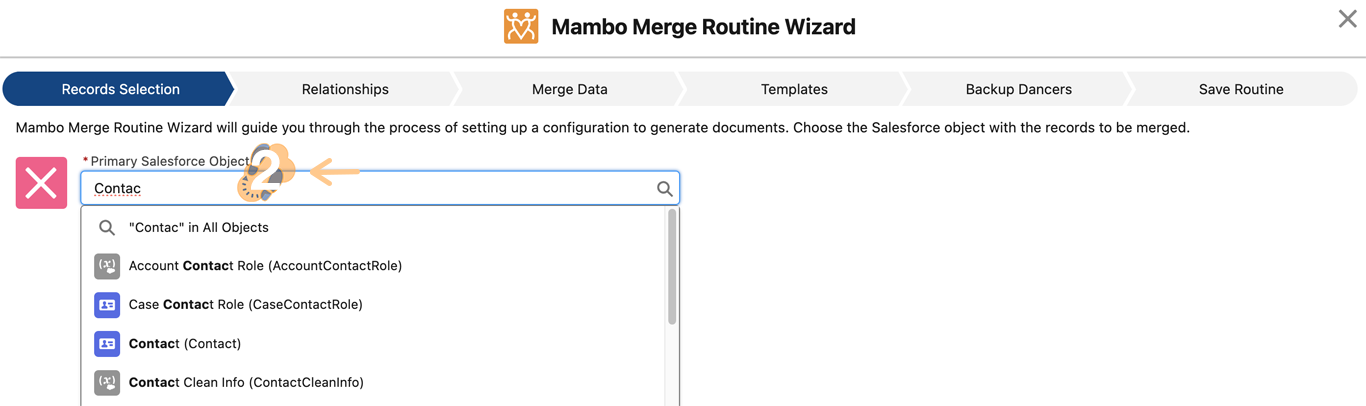
Note: The Studio may automatically select an object based on where the component was added.
2.5 To get started select “Single Record” and click “Next” to proceed.

Note: Check out this article for more in-depth information on the Studio or Routine Building.
2.6 Next is the Relationships page. Relationships allow you to tell Mambo Merge information you need from related records to your Primary Salesforce Object record. For this routine build, we don’t need to set up Relationships, so click “Next” to skip and proceed.

Note: In Full Speed Edition, you can add relationships one level away (Parent to Child object relationships). In Performance Edition, you can add relationships that are more than one level away and unrelated objects.
Step 3: Build A Template ↵
On the next page is your Merge Data preview, where all the merge fields available (and accessible within your primary object selection) and the merge format. This is a good point to build your template.
3.1 Start by simply using the “Collapse” or “Expand” buttons to locate the fields you’ll need to build out a template.

3.2 Create a DOCX Template File
You’ll need to prepare a DOCX file to use within the component by either taking an existing document or creating one from scratch. You can use any Document Editor that allows you to save the File as a DOCX file. Customize it by inserting merge fields where you want the field data to appear.
Note: You can also use the Template Builder within a Mambo Merge component to retrieve merge field format to use within your document.
3.3 In our example below we are taking an existing document and adding merge syntax to retrieve opportunity data from an opportunity record. All merge syntax will be identified with the double curly bracket notation along with a field name e.g. {{Merge_Field_Name}}.

3.4 Click “Next” within the “Merge Data” window to proceed.
Step 4: Add a Template ↵
On the Templates page, you can add Templates to your Routine. There are several options for assigning Templates to your Routine:
- “Upload a Template for Each Merge” checkbox
- “Browse From Files” button
- “Dropdown Menu” button
- Add Blank Template
- Upload Template
4.1 Click on “Upload Template” and choose where to save the template.

Note: We recommend using libraries to hold all templates to share and manage easily. Mambo Merge automatically creates a Mambo Merge Template Library, but you can create additional libraries and organize as you like.
4.2 Once uploaded a Template “Label” is added to the page. Type here how your Template options (Button, Dropdown selection, etc.) should be named.

4.3 Next setting is the “Destination” dropdown list, where you decide how your generated document is saved. You can either “Attach to the Record”, “Save to Library”, “Attach to Specific Record” or “Download Immediately”.

4.4 Generated File Name is what your new document will be named. Type what you would like your new Document to be named. You can also use merge fields to create a more dynamic naming system.
Note: Automatically, it is filled with the same name as your Template File. It is advised to change this, as Salesforce will allow several Documents to have the same name, and this can confuse you later on.

Once you’ve filled out your Template Label, you are ready to proceed by clicking on “Next”.
Note: You can add multiple templates which will require you to configure each one and will add Template Label to your routine.
Step 5: Backup Dancers ↵
Mambo Merge can run some post-merge actions using “Backup Dancers”. These actions include updating record information, saving a task and even sending an email! For this routine, we won’t add any of these actions. Click “Next” to proceed.

Note: Check out our support site to obtain instructions on how to use Backup Dancers.
Step 6: Save Routine ↵
We just need a few more actions to complete this routine.
6.1 First, we need to give your routine a name and description. Keep the name simple and to the point, as you will need to use this later to activate the routine.

6.2 The “Display Type” lets you choose what type of interface each template linked is going to have. Choose one of the options available. A “Preview” of what the component will look like. Once you’ve decided on the name, description, and display type click on “Save”.
Note: Our default display type is set to buttons but can be changed to whatever suits your needs. It is recommend to not use buttons with more than 5 templates, as it will get crowded. Also, the buttons are dynamic to the Label Names.
Step 7: Activate Routine ↵
Now that you have a routine saved you are ready to activate it within a component.
7.1 Start by heading back to the object record page where the component was first installed, to edit its page layout.

7.2 Click on the “Gear” icon in the top right corner and select “Edit Page”.

7.3 Head over to the Mambo Merge component and click on it to configure its settings. Enter the “routine name”, we saved previously into the “Routine/Template ID” field.

7.4 When the syntax is confirmed the component will now match the preview shown while setting up the routine. Simply press the “Save” button and “Back Arrow” to complete the activation.

Now your routine will be activated within the component and ready to merge records to generate documents at the push of a button.
Take your Mambo Moves and upgrade to Full Speed, today!
You are now ready to test your routine and begin building more routines that will allow you to unlock more potential within your org.
To get more information on using Full Speed Edition, check out our Advance Articles.
For more guidance on using Mambo Merge Free(style) Edition, check out Free(style)